Tag Archives: algebra

So I Guess I’m Making Videos Now

I had to be absent a couple days last week, and I wanted to the class to learn some new material.  We had just spent two days simplifiying radicals, and I wanted them to move onto adding and subtracting.  So I decided to make a quick video of myself explaining how to do it.

[youtube http://www.youtube.com/watch?v=AQ6j4ZrMMBY]

The next day basically every single student I have told me how much they loved the video.  The sub-report talked about how great it was.  A couple teachers and a teachers aid all told me at various times throughout the day that they heard I made some great video.  Then yesterday a student told me that she learns better from my videos than she does from me (thanks…  I think?).   And after multiple students asked if the video was online, I figured I should put it online.

And it’s kind of funny because they are nothing special at all – straight up direct instruction.  But it seems like some students got something out of them, so who I am to judge?  And just like Khan I suppose, I did them in one take so they are not time consuming to create.  I ended up making 1 for geometry, and 2 for algebra.

Oh yeah, and I am certainly not going to post them all to this blog.

Teaching Mixture Problems With The Mixture Picture

I just want to throw my hat into the mix and say that I also have found Marlo Warburton’s “Mixture Picture” to be an extremely effective way of teaching mixture problems.  I mean you get to do a demonstration in an algebra class!  Just that alone makes it awesome, not to mention students like it and find it helpful.  So what is it? (You haven’t seen the video?  You are soo uncool)  The “Mixture Picture” is a graphical organizer that helps students make sense of mixture problems.  The above link directs you to the Teaching Channel that has a video of her giving the lesson, as well as handouts.

Screen shot 2013-05-12 at 5.14.43 PM

I have never had much success with mixture problems, so I was happy to try anything different.  I could not have been happier with the results – the entire class was engaged.  After the first example, a majority of the class was up and running on it.  I am not going into the details of it because it is all in the video, which I followed very closely.  I’ll just move into some advice I have gained from the experience.

MixturePictureWhiteBoard

The Advice

1.  If you are going to use the worksheets from the Teaching Channel, then I would start with the worksheet “Homework Sheet for Day 1 of Mixture Problems” because problem #2 of the worksheet “8th Grade Mixture Problems” is too different from problem #1.

2.  Don’t give your students anything in Comic Sans – so retype the worksheet “Homework Sheet for Day 1 of Mixture Problems” with a different font.

3.  Do the demonstration.  I brought in some red food coloring and continued to go back to that demonstration throughout the class.  Check the video for how to do the demonstration.

MixturePictureDemo

4.  My students quickly grasped how to do it when there were three percentages given – but when only two percentages are given, the students initially struggle.  That’s why I brough the container of food coloring to class with me.  Because food coloring is a 100% food coloring!  That helped them know when to use 100%.

5.  The Seesaw example that Marlo does on the whiteboard is critical to show the students.   I would continue to go back to it every time the students were working on a mixture problem.

The Goods

All the handouts are on the Teaching Channel website.  But remember the Mixture Picture is a method – not a worksheet, so you can just use the mixture problems in your textbook.

Taboo – Quadratic Functions

The Overview

Improve student literacy by focusing in on the math terms surrounding quadratic functions, and then play Taboo using those terms.

IMG_0483

The Description

Warning:  Your students will have a lot of fun with this.

Taboo is a game where you try to get your team members to say the word on your card, but there are a list of restricted words that you cannot use in your descriptions.

I read Fawn Nygun’s Taboo activity and I wanted to do it with my class.  I love how she implemented it by having her students create the cards.  But I decided to control the words in Taboo by creating the cards myself.  This allowed me to scaffold it by first focusing on improving student literacy on the words that I had put into the game.

To scaffold the words that were going into Taboo I decided to use Frayer Models.  I created the packet “My book of Frayer Models” and we did two each day for a week.  It was a warmup activity that they did when they first walked into class, probably took 20 to 30 minutes each day.  Below is an example of one of the pages of a students Frayer Model book.  I would give students the page number where the word could be found in their textbook, and I had them do the model themselves while I did the routines of checking off homework and taking role.

IMG_0487

After I was done checking homework, taking role, I would randomly call on students and get my Frayer Model completed on the whiteboard.  Lastly for each Frayer Model, I would put the word on the whiteboard and ask students for key words that describe it.   This portion of the lesson acted as my substitute for when Fawn’s students wrote out their own taboo cards.  We were essentially writing out a Taboo card as a class, and it allowed me to see what words the students deemed important.

After we finished their book of Frayer Models – It was time for Taboo!

The taboo cards focus on quadratic functions.  I didn’t make them all related to quadratic functions in order to give students the illusion that the game was covering the entire book.  The restricted words were choosen to leave the door open for good mathematical descriptions and not make the game too difficult.  Thus for the word “parabola” I didn’t include “quadratic” as a restricted word.    For me, the restricted words were really meant to try and take away the cheap clues, rather than the good mathematical clues – like for instance with the card “Domain” I restricted “Range” but I did not restrict “x” or “value”.

The rules for Taboo were basically the same as Fawn’s, but here they are:

  1. Class is divided into 2 teams, Team X and Team Y.
  2. Team X goes first: two people from Team X come up to front.
  3. Skipping a word is not allowed.
  4. Team has 1 minute to get as many right as possible.
  5. No hand gestures.

The Keynote slides attached below have a description of how I explained the Taboo game to the students.

For the final round, I was describing each card and giving points to the team that could guess it first.

The Advice:

– I would let one student volunteer to come up and I would randomly select a second student to join them.  I had students who never volunteer for anything, volunteering for this.

– Ultimately if the students knew the goal of Taboo was to work vocabulary of quadratics, then they could just list off all those key words every round.  So it’s important to do the following two things in order to give the students the illusion that any term in the book is possible.

  1. Do not tell the students that they are going to use the terms from the Frayer Models to play Taboo.  Even though every term from the Frayer Models are in the game, the students don’t need to know that.  I even collected the Frayer Models to day before playing Taboo.
  2. Throw in some math terms that do not have to do with quadratics.

– Students liked to say things like “the opposite of” – so if you have a card for maximum, make sure minimum is a restricted word.

– Use the restricted words to keep students from being able to use a non-math description.

– Have your TA cutout the Taboo cards and glue them to playing cards.

The Results:

A high level of engagement.  Definitely an animated class and everyone enjoyed the activity.  Students were shouting out a lot of great vocabulary, and I felt good that the Frayer Models had given them improved math literacy.

The Goods:

BookOfFrayerModels

QuadraticTabooCards  (There are only enough cards here for 2 or 3 one minute rounds if you have two teams)

TabooSlides

Parabola Review Worksheet

I created the following worksheet to help students review what they learned about identifying the different characteristics of a parabola.

ParabolasCharacteristics

After printing it out I decided that I wanted to make it an error analysis exercise instead, so I filled it out myself and made one or two mistakes for each parabola.   I had students put check marks by the correct answers, circle and fix the wrong answers.  Here’s that worksheet:

MathHustlaError

The Goods:

ParabolasCharacteristics

ParabolaCharacteristicsError

Investigator Training

The Description:

The goal here was to use Dan Meyer’s “Bone Collector” 3Act problem, as the motivation for a series of lessons on scaling.

dollar2foot

The basic premise is as follows:  I show the Bone Collector clip first (see the link above for the clip), tell them we need to figure out the shoe size of the killer because we need to make sure that the killer is not in the room.   Then I concede that I realize they are not trained investigators.  Thus I tell them that over the next couple days we will be doing some investigator training, to get them ready to take on this case.   I help a lot during the first two cases, but I provide little help during the Bone Collector case – and the good news is that they didn’t need much help on it after the investigator training.

CASE 1 “The Drug House”

For their first case, I used a google maps images (see Keynote or PowerPoint file below) of a huge house that I was calling a “known drug” house (It’s actually Michael Jordan’s house).  The goal is for them to calculate the area of the very suspicious large building at the bottom right of the picture, where a lot of cars are located.  I tell them the FBI wants to perform a raid but they do not know how many agents to send, because they don’t know the size of the building.  And they are waiting for our calculations to proceed.

DrugHouseGoogleMaps

I handout the above picture to each student.  Then do a little strategy session where they write down how they are going to calculate the size of the building.  At that point they are given time to solve it with their pair/share partner.

The next day  I come and say that althought the FBI was happy that we correctly calculated the size of the building, unfortunately after performing the raid they learned that this was not a drug house, it was in fact Michael Jordan’s house.  And that big building is a basketball court.

CASE 2 “The Statue Thief”

I use a picture of the Surfer Memorial Statue in Santa Cruz.  Then I show a the same picture but with the statue photoshopped out.  I then tell them that a security camera picked up a very suspecious person who had visited the statue multiple times before night of the theft , and that the FBI needs us to find the height of the suspect in the picture.  This case is very similar to the Bone Collector.

StatueThief3_2

(awesome statue)

StatueThief3

(sadly it was stolen)

StatueThiefSuspect1

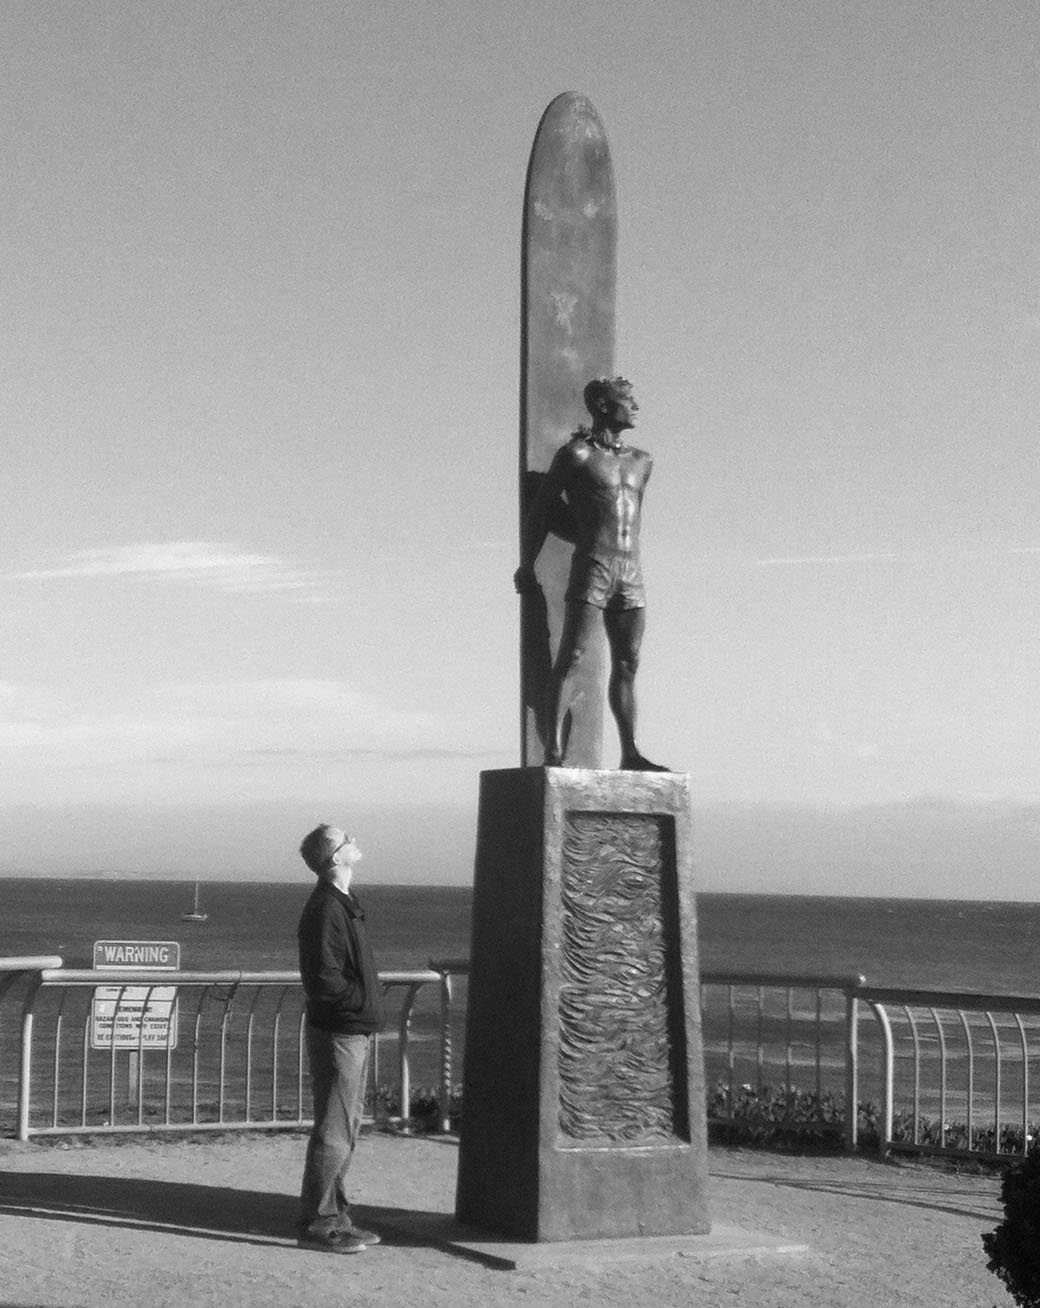
(but we have a suspect)

Students get a copy of the image above.  We again do a strategy session, where I require them to write a strategy for finding the suspects height.

The next day I reveal that the suspect was captured and he is 6ft.  Most students calculate something around 6″3′, so we spend some time talking about possible sources of error.

CASE #3 The Bootprint

Here we do the actual Bone Collector problem, delievered in much the same way that is described in Dan’s blog.

The Advice:

– I have students work in groups of two.

– I don’t spend the entire class period on these.  I do investigator training for the first 20 minutes or so, and then move on to something else.  Thus I essentially make this investigator training week.

– I help the students with the strategy sessions for the two practice cases, and then leave it up to them for the Bone Collector problem.

– Definitely play up the investigation aspect of these cases.  I tell them how much investigator make and that they should take these cases to the polic department and interview for a job.  If a couple students complain the quality of the bootprint picture is not very good, respond with “Yeah, I’m not sure why the FBI would provide such a low quality image”.

– That is me in the picture for the “Statue Thief” problem.  That is definitely an added bonus if you can do it.  It allows me to completley deny it’s me, while also saying “Look it’s not enough to just tell the police the suspect is extremely good looking, we have to get them information about his height”.

The Results:

High level of engagement.  Take a listen to student reaction when they hear that the shoe print is a size 10.

Bone Collecter student reaction

The students were upset (yes, actually upset) because all their solutions were between size 13.5 and size 16.5 .  They all calculated a larger size because they used the bootprint, rather than the actual size of the foot inside the boot to convert to shoe size.   I ended the lesson with a great back and forth with the students about what happened with their calculations.

One of my lowest performing students asked me if her proportion she setup was correct…  it was.

Using the Bone Collector clip without the associated investigator training works too, but not as well for me.  I really enjoyed these lessons, and I felt like my two initial cases put the students in a place to be successful with the Bone Collector problem.

The Goods:

Dan Meyer – Bone Collector problem

The Drug House Handout

The Statue Thief Handout

Bone Collector Bootprint  (just pick one – my girlfriend and I messed around with the image in photoshop to get the best quality for different printers)

InvestigatorTraining   (Keynote and PowerPoint)  I created this in Keynote, and highly recommend using Keynote.

Update 1:

To see whether or not the students retained any of this, I put the following picture into the chapter test.  The question was:  How tall is the tree?

MrHaysAndTree

The guy in the picture was brave enough to take me on as his student teacher and I am a profoundly better teacher because of it.  His name is Walt Hays.  His height is 6ft.

Update 2: 3/23

Based on Debbie’s comment, I have fixed the typos in the Keynote and Powerpoint files and adjusted the scaling to result in an answer that is consistent with the size of the tennis court next to the basketball court building.


Factoring Puzzle – Practice Version

The Overview:

I wrote about a factoring puzzle I found online here.  That puzzle is difficult because it has trinomials with a leading coefficients other than 1, as well as special products.  I wanted to create a puzzle that would be a simple review on factoring trinomials where the leading coefficient is always 1, or could be 1 if the GCF is factored out first.  Thus when they eventually challenge the more difficult puzzle, their questions will be focused on factoring, rather that “I don’t get what to do?”.

I did not create a scrambled version, so obviously you will need have a TA cut out the pieces and put them into envelopes.

FactorPuzzlePractice

FactorPuzzleChallenge

The Goods:

FactorPuzzlePractice

FactorPuzzleChallenge

Update 1:

Thanks to a great comment from John, I have created one that does not have a border, thus allowing us to differentiate for the excelling students.  That puzzle is now included above in the original post.  The puzzle without the border is the exact same on the inside as the puzzle with the border, I will eventually make that different too when I get some time.

‘Who Am I’ Worksheets

The Overview

I have been making more of these “Who Am I” style worksheets where the students are given a set of clues and possible answers, and they need to figure out which answer works for which clue.  I would consider this a graphical organizer and a puzzle activity, since all the information is already organized, and the students are making connections between the answers and the clues.

The worksheet for graphing slope intercept has exactly one right answer for each clue.  The one for classifying polynomials has a couple right answers for some of the clues.  I think my next “Who Am I” worksheet will have some answers that do not fit any of the clues, which will take away any process of elimination technique the students may be using.

WhoAmIClassifyingPolynomials

The Goods

WhoAmI_SlopeIntercept

WhoAmI_ClassifyingPolynomials

Algebra Remix – The First 20 Days.

One of my goals for 2013 is to rework the first 20 days of algebra to tightly connect it to algebra standards – specifically linear functions.  First semester algebra should begin by setting the goal of understanding linear functions, and everything we do from that point on is in support of that goal.  Currently algebra begins with a basic review of 6th grade standards – adding / subtracting, substitution, order of operations.   I think we should still practice all those skills, but only in service of linear functions.

We currently review those skills in a vacuum, without making connections to algebra standards, such as slope-intercept form, slope, y-intercept, and graphing.   I think we should make sure that when students are practicing their fundamentals, that they are also learning about algebra fundamentals.  For example – practice subtracting negative numbers by first introducing the slope equation, and then asking them to find the slope given two points.  That way they are still practicing subtraction, but they are doing it in service of linear functions.

I believe that after the first 20 days of algebra students should:

  1. be able to graph an equation by plugging in two points.
  2. be able to graph using slope-intercept equation.
  3. understand the difference between discete and continous graphs.
  4. understand how to find slope from a graph
  5. be able to solve for slope using the slope formula.
  6. review skills of multiplying, subtracting negative numbers.
  7. write slope-intercept equation from a graph.
  8. determine if graphs are increasing, decreasing, and connect that concept to positive / negative slopes.
  9. indentify slope and y-intercept from the slope-intercept form of an equation.
  10. determine if a relation is a function.
  11. practice order of operations.
  12. understand domain and range.
  13. be familiar with the concept of an input and an output.
  14. be able to solve a basic two step equation.
  15. solve word problems where the solution takes the form of y=mx+b.

I currently putting this 20 day learning segment together and proposing it to my district.  As it gets completed, I will post it.

Update 1

My principal likes this idea some much he gave me a one day pullout to work with our district curriculeum and instructional specialist on this idea.   We currently have 25 days of remix going, so I should change the name of this post.  I am very excited about the work we got accomplished, and with another pullout day scheduled after star testing, I thinking we will have this well put together by the end of the school year.

The instructional specialist is wanted to make sure our final product works for common core, so that was an added dimension to all this.

Math Hospital Remix

I decided to remix the Math Hospital.  All the steps are the same that I outline in my original post about the activity, which can be found here.   The only difference is the handout, where I now embed the problem that we are fixing into the worksheet.  This allows students to circle and point to the things that they like, or believe are right or wrong.  I also have them fix the patient (correct the problem) right there on the worksheet.

MathHospital2The Advice

Sell the hospital.  To have them quite down, tell them the patient is sleeping.  If correcting the problem becomes homework, say “I want to have this patient looking healthy by tomorrow”.  And so forth…

I’ve done this in groups of four, but typically it is done individually.

Get it Wrong

Yesterday I was teaching solving two-step equations in algebra, and I gave them a worksheet with 5 problems on it.  We did two problems in my teach/pair/share format.   Then I asked them to trade papers with their partner, and do problem #5 on their partners paper.  The only catch was – they had to do it wrong.  They needed to make a mistake.  Problem #5 looked like this: 2x + 8 = 16.

I told them not to get it obviously wrong, no dividing both sides randomly by 113. But to try to do a common mistake that either they have made in the past, or something that might happen.

It was pretty funny for the class as I walked around and looked at each persons paper and said something like “That’s definitely not right.  Great Job!”.  After 5 minutes I had students trade papers again and correct the mistake their partner made.

Students will not know why you are having them do this, so hit them with something like this–> Important Speech:  The reason we are doing this is because when you are trying to get something wrong, you inevitably have to think about how to get it right, because you have to know what is right in order to avoid it.   So getting a problem wrong is another way to think about how to get a problem right.  The added benefit is that by doing a problem incorrectly, you also get to expose yourself to the most mistakes that are made, so then you won’t make them in the future.  And lastly, you even get to correct someone elses mistake, which even further improves your understanding of a problem.

After I said something similar to above, most the class had an “oh yeah, that makes sense” look in their eyes.

The Advice:

I would be careful to use this technique on the first day I introduce a topic.  I am a bit concerned how effective it would be if half the class has no idea how to do it the right way.  I have only used it during the 2nd or 3rd day (55 minute classes) we look at a topic.